Create a Slack Bot with TypeScript in 3 Steps
.png)

Today more and more companies use Slack to ensure communication within their teams. Slack includes different features, including direct messages, private and public channels, voice and video calls, file searching, and bot integrations.
This article is a tutorial on how to make a Slack bot. Slack bot is a program that can perform different tasks, like sending messages, files, pictures, opening modals, sending emoji reactions, alerting on various events, etc.
Why Create a Slack Bot?
Though Slack offers a lot of applications for any purpose in the Slack App Directory, there can still be a need for custom applications, as every business has its own needs and requirements. Sometimes it is extremely hard to find a suitable option from the existing ones. In this case, it can be a great idea to create a Slack bot of your own.
There are many ways how to use Slack bots to your advantage. They may simplify work processes or to increase revenue, so let's recall some of them:
- Automating business processes;
- Integrating with the tools used for marketing, sales or project management;
- Giving the users an option to perform actions without leaving Slack;
- Providing support services;
- Assistance in sales, allowing to place orders using a Slack bot;
- Creating a fun tool that can be a part of your company or startup culture.
If you want to create your own bot, let's take a look at an example of how to build a Slack bot.
Not sure about how to create your own Slack bot?
Our experts are ready to help. Book a consultation, and they will be happy to answer any questions.

Step 1: Initial Slack Bot Setup
For study purposes we'll make a Slack bot that adds a new shortcut to your workspace mentioning all admins in it, but making it invisible for the Slack workspace non-admins. It might be used as some kind of "report" tool, when you see someone behave inappropriately, you anonymously invite Slack admins to take some action.
What is a Slack shortcut? It's a command available either in chat or globally, anywhere in Slack. When you invoke a shortcut, some custom action happens. Example of a chat shortcut is on the picture below:
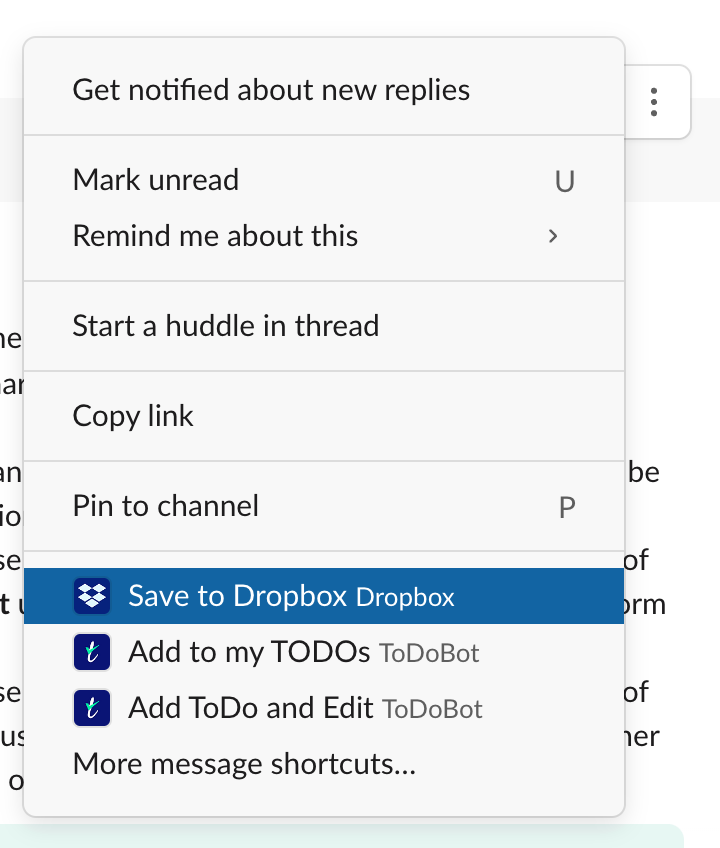
"Save to Dropbox" will save the image from the post to the Dropbox account. "Add to my TODOs" and "Add ToDo and Edit" will create a new todo in ToDoBot.
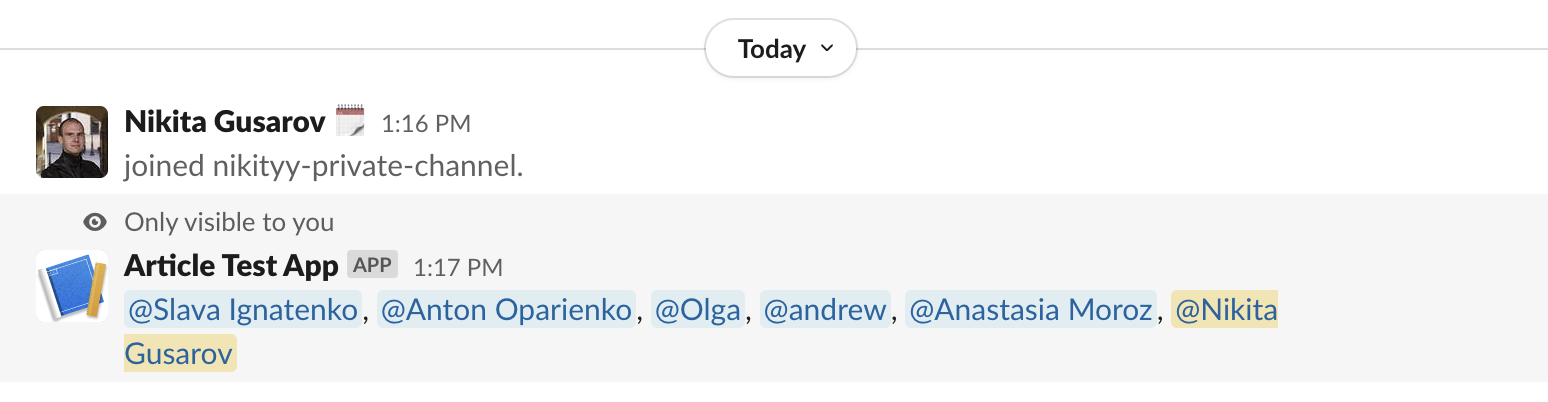
What we're up to is to create a Slack bot to add a chat shortcut. When you invoke it, a new message will be posted to the same Slack channel mentioning all Slack workspace admins. The message will be "ephemeral" in terms of Slack, meaning that only admins themselves can see the message.
The desired action happens when Slack invokes a callback to user action on our server, so we'll write a server that does the job. All code listed below can be found in our repository.
Before we start to build a Slack bot you need to make sure you have installed Node.js on your machine. If you know you're not, here's how you can install Node.js on your macOS computes:
By the way, what is a Slack bot essentially? Slack bot is an HTTP server, meaning that when the user makes some interaction in Slack, Slack will send an HTTP request to your server. When handling this HTTP request you might call some Slack APIs (like, posting a message, creating a channel, etc.) — this is how interactive magic happens!
Let's take a quick tour of Slack API authentication. In order to use Slack API, you need to obtain an API token.
The first and the easiest way to obtain a token is to issue a special application token only for your workspace in the Slack dev portal. Note that this token gives you access only to your workspace, it means that this token can't be used on production or any environment other than your local machine. We'll issue one later in this article.
The second way to issue a token is to use Slack OAuth. Slack API conforms to the standard OAuth mechanism, which can be described the following way. At first, when you want to obtain a token for the workspace, you need to generate a special link to Slack OAuth. Second, you need someone from this workspace to follow the link and grant the access for the workspace to your application. After that, a request will be sent to your server containing a special code which you can exchange for an access token.
When you want to start development, stick to the first option. When you want to go production, get ready for the second option.
Step 2: Building a Slack Bot
Go to https://api.slack.com/apps?new_app=1. There you should see a modal window:
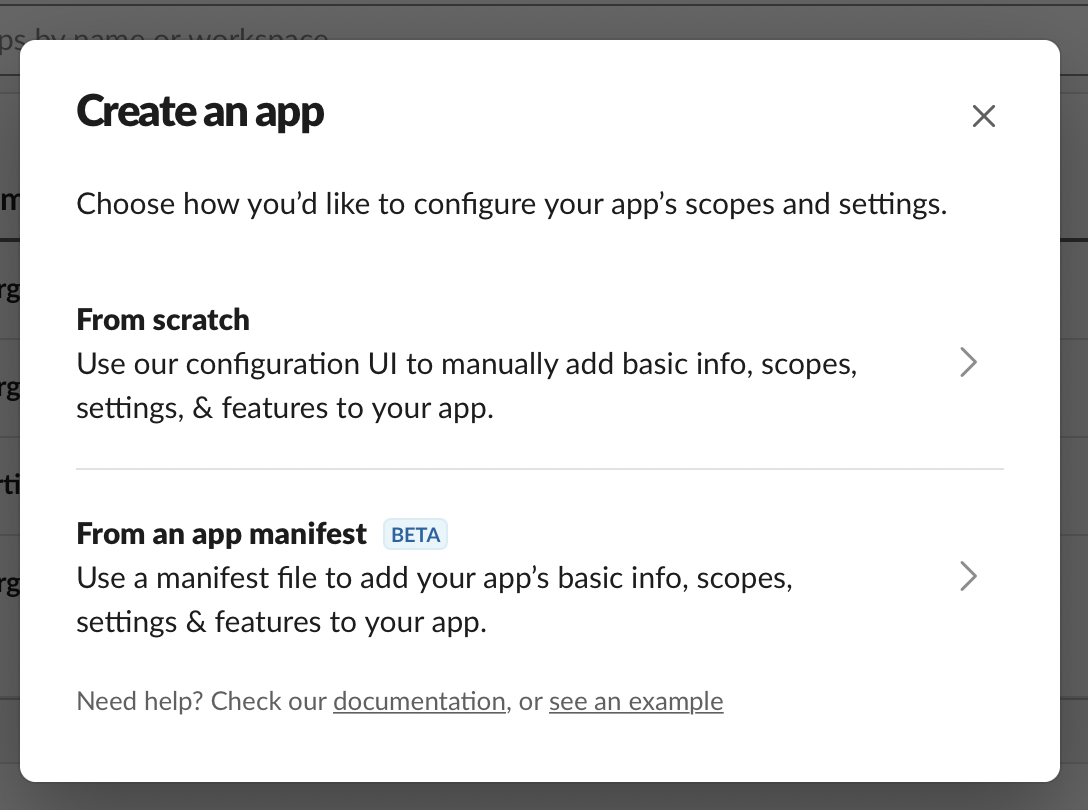
The difference between "From scratch" and "From an app manifest" options lies in how you're going to initially configure your Slack bot. Later you can change the bot settings both via UI and using the manifest.
- "From scratch" means that Slack will put you through some kind of wizard asking several questions god-only-known-how-to-answer.
- "From an app manifest" means that you'll have to fulfill configuration using the structured text format, such as JSON or YAML.
In case it's your first Slack bot, you better choose "From scratch", but for this article purposes you'll be given a ready-to-paste configuration with comments.
Choose "From an app manifest", select your workspace in the dropdown and then paste the following YAML to the text area, and then press "Create":
Let's review the contents of the manifest.
If there were no Socket Mode, we would have to use something like ngrok or LocalXpose to expose our local port to the Internet. Otherwise, we can use socket mode, which will use some workaround to handle incoming HTTP requests even when a non-public IP address is used. Read more about Socket Mode on official documentation.
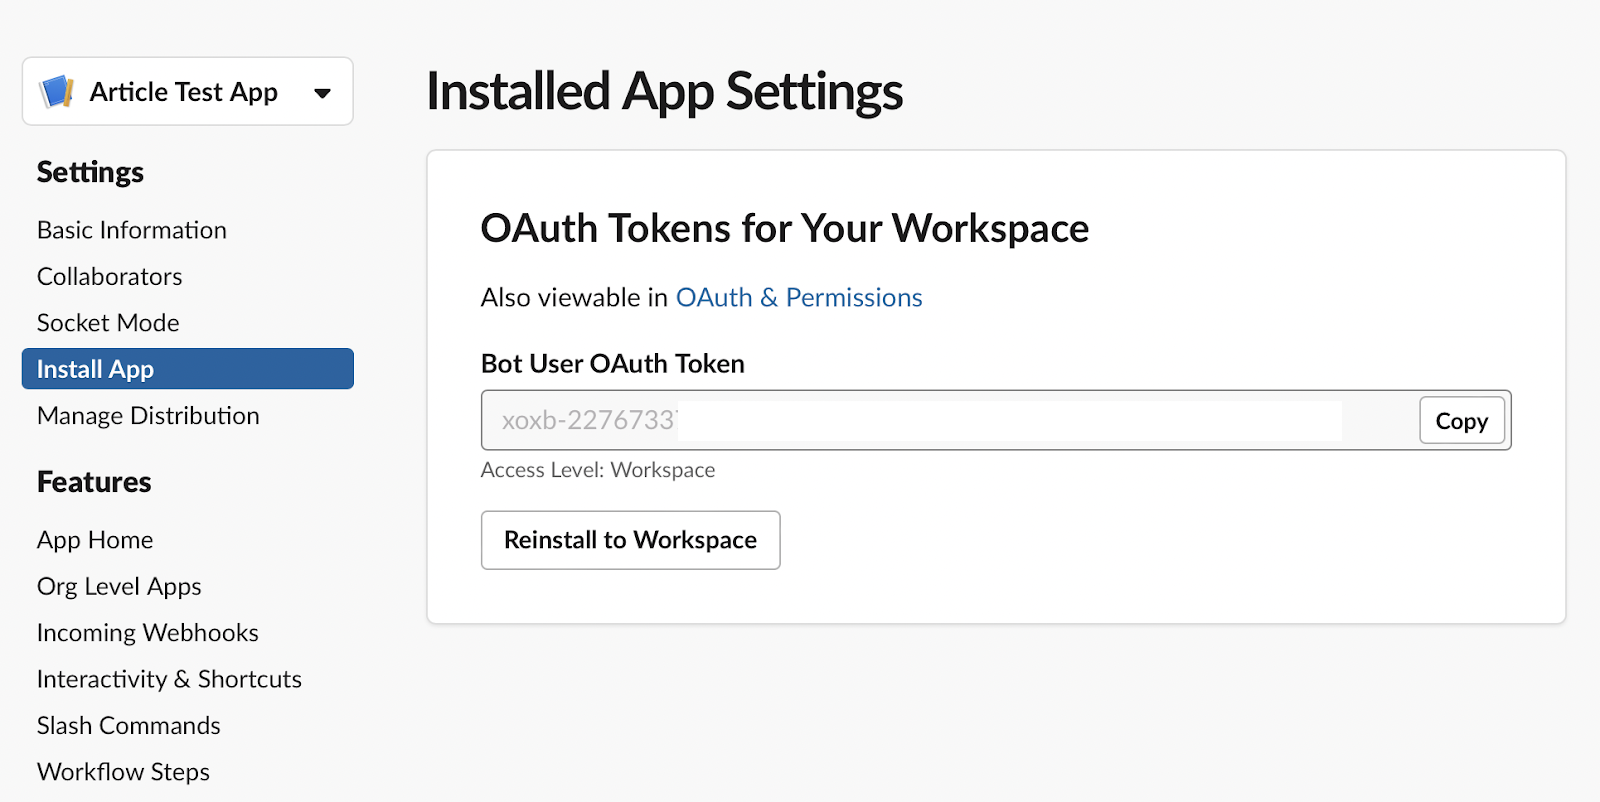
You will be redirected to the app page. Press the "Install to Workspace" button, and then allow access to your workspace. When you click "Allow", Slack grants the permissions you asked in the manifest. If you should add a new permission, you should reinstall the application as well.
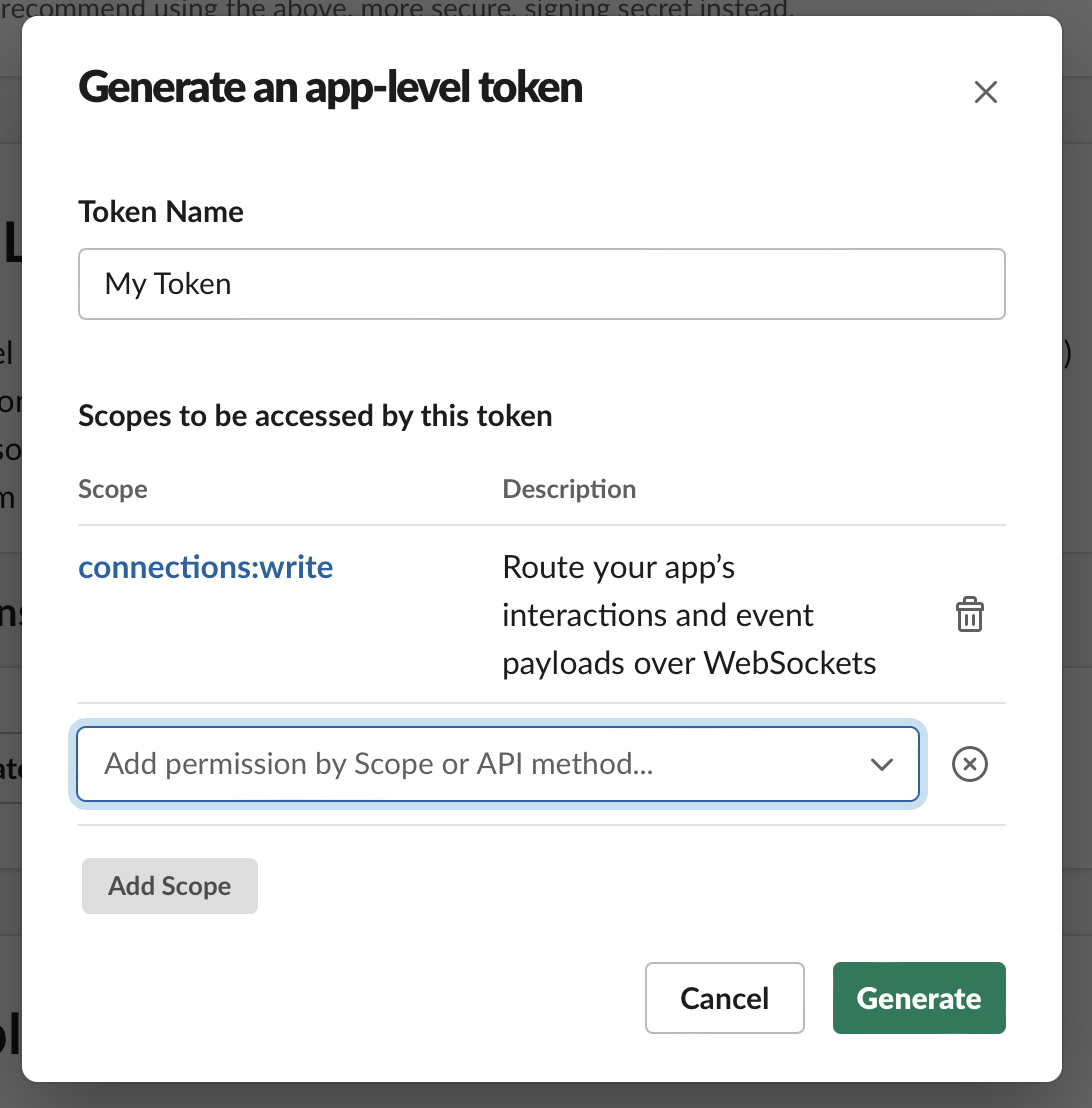
Next we need an app-level token to use Socket Mode. When you're redirected back to the app page, scroll down to "App-Level Tokens" sections and click "Generate Token and Scopes" there.
Step 3: Running and Testing the Application
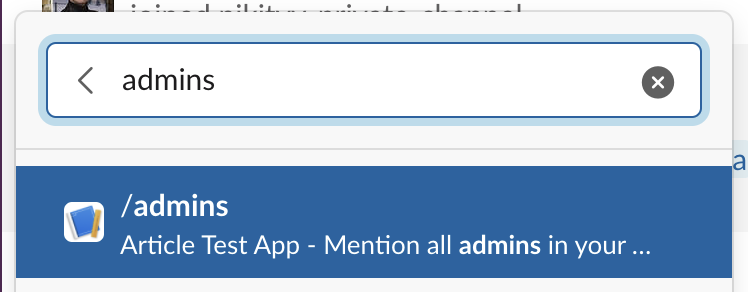
Go to any channel and start typing "/admins". You should see a suggestion with your app command.
Choose it and then send the message. An ephemeral message will be sent to the channel (hence only you can see the message).
Conclusion
A Slack bot can be a powerful tool to automate your business' workflows and make them more effective. When you think about how to create a Slack bot efficiently, it is very important to consider its infrastructure, the events it receives, and the user experience.
Hope that this guide helped you better understand how to make a Slack bot that can perform some useful tasks. It is also possible to add some extra features to your bot, or modify it so that it will suit your requirements. If you still have questions, please feel free to contact our team, and they will be happy to help. Our experts have extensive experience in Slack bot development and are glad to share their knowledge.


to top